BACKGROUND
From time to time all backflow reps, no matter the manufacturer, all get the dreaded same phone call, “The backflow you shipped out to the jobsite is leaking, can you go fix it?” Having worked on all sides of this issue, I can tell you that statistically backflow assemblies leaving the manufacturing plant are almost never defective because all manufacturers 100% pre-test assemblies to ensure they function correctly so that leaks or failures should not happen on the jobsite.
If a brand-newly installed assembly, just out of the box, started leaking, it will cost time, money and brand reputation. Rather than go through this pain staking process, manufacturers take extra precautions at the factory so problems like this rarely take place.
While all manufacturers test to make sure they are properly working, the Watts® umbrella (AMES, DERINGER, FEBCO and WATTS) test each assembly with filtered water and have strainers at each test station to make sure that before the assembly gets to the jobsite, no debris is inside the assembly.
See figure # 1 below. When the manufacturer ships an assembly, this is how the internals are positioned. The first check in an RP has a minimum five-pound spring loaded to a closed position. The second check of the RP has a minimum one-pound spring that is also loaded to a closed position. However, the relief valve has a minimum two pound spring loaded to the open position. After 100% testing, all manufacturers ship RP assemblies with the checks in the normal closed position. This is also, until installed and normally pressurized, how hydraulically water downstream of the number two check can’t backflow past the second and first checks (Backflow).
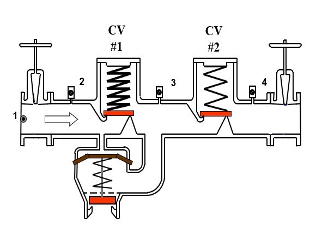
Manufacturers give contractors and engineers a lot of options to choose from, after all each project is unique. You might have an old building whose existing piping has flanged connections, and the contractor is planning on connecting the piping downstream of the backflow prevention assembly with groove by grooved connections. This is very typical in fire installations. We can even have a situation where the backflow preventer’s #1 shut off valve is Outside Stem & Yoke (OSY) while the #2 shut off valve might be a UL butterfly. The options are endless. The only option that you cannot order with a backflow prevention assembly is rocks, dirt, or debris.
What typically causes backflow prevention assemblies to fail? Often the installing contractor does not flush out the line, or the infrastructure is so old that the water utility sold you water with debris in it. Whatever the reason debris got into the assembly. We must now figure out what is causing the discharge, leak or the failed test. The following are some tips on how you can troubleshoot an assembly from your office or even your smart phone.
SERVICING TIPS (assuming a failed test)
The leak can be happening at one of three components. The first check, the second check or the relief valve. We should all know that when backflow prevention assemblies are tested, they must be in a static no-flow condition otherwise the tester will get erroneous reading. Provided that the water is allowed to be shut off to troubleshoot our assembly, let’s turn off the number two shut off valve and observe. Did the assembly stop leaking from the relief valve?
SCENERIO # 1
With the #2 shutoff closed, If the relief valve continues to leak, we have a fifty-fifty chance of what is causing the leak. It is either coming the first check or the relief valve. If you trick the backflow assembly into a flow condition by opening test port number four, both number one and two checks must be open to allow water flow to escape through the number four test port. If the relief value discharge/leak stops, you know that the relief valve is working, it closed! If the relief valve discharge/leak continues, check valves number one and two are taken out of this equation. It cannot be the number one or number two checks because both checks are in the open position flowing water out the number four test port and when water is running, the relief can only leak if there is debris in the relief valve or the relief valve sensing line.
SCENERIO # 2
After observing scenario # 1 and the relief valve continues to leak, then the only problem it could be is that there is debris in the relief valve.
SCENERIO # 3
You might be asking why can’t the leak be caused by a faulty or fouled second check? It can but three failures must happen at the same time. The second shut off valve must leak, there must be enough backpressure to cause flow to pass back through past the second shutoff valve and the second check must be fouled by debris or otherwise not closing. Even though you have backpressure coming through the number two shut off valve, if the second check is holding tight thereby not allowing any water into the reduced pressure zone between the 2 checks.
SCENERIO # 4
If both the second shut off valve and the second check are both leaking, that means backpressure has entered and increased the pressure in the reduced pressure zone of the RP. At this point the relief valve will open, discharging water once the relief valve spring tension is overtaken by the now higher pressure in the reduced pressure zone caused by the backpressure thru the fouled second check and open second shut off valve. Depending upon how much water is passing through the second shut off valve and through the second check will depend on the reaction time on how fast the relief opens.
In order for this scenario to take place, you will need to very patient. The first three scenarios take place very quickly, but in order for scenario four to take place you must be patient. Your backflow was leaking, you did your steps and still your relief does not leak, you have wait until the reduced pressure zone pressure is increased by enough backpressure thru the fouled second check in order to make the relief valve open. Sometimes this last step takes minutes and sometimes it could take hours.
This trouble shooting quick guide is a way to find out where your problem is really coming from. It does not tell you the minimum value requirements needed so that the assembly can work properly. When a Certified Backflow Tester shows up to test your backflow assembly, the tester will go through the test procedures and chronologically eliminate all these scenarios one-by-one. After finding the problem the certified tester/repairer prepare a test form giving the owner some valid differential readings across the first and second check and the relief opening so that the water supply is safeguarded from your system.
SOURCES
Mr. Pete Chapman
University of Florida – TREEO
University of Southern California – FCCCHR
American Society of Sanitary Engineering (ASSE)
American Backflow Prevention Association (ABPA)
About the Author |
|
| Nick Azmo has over thirty-five years of experience in the plumbing, mechanical and code enforcement fields. He currently works for Edwards, Platt & Deely as an outside representative calling upon contractors, engineers and code officials. Nick was Past Vice-Chair of the AWWA Cross-Connection Committee and holds a State of NJ Master Plumbers License as well as a NJ Plumbing Inspectors License where he was the Past Secretary for over five years. As a subject matter expert in the field of Backflow Prevention and Cross-Connection Control he currently serves on several of the ASSE backflow working group committees and has been a backflow pundit to several of the backflow trade journals. If you would like further information on how to troubleshoot any of the eight ASSE backflow assemblies, please E-mail him at nick@epdreps.com | |


 26 Aug 2020
 Posted by BP Journal







1 Comment
very helpful info I just ran into this problem and I was not the installer but as a backflow inspector tester was asked to fix the problem , installer had not flushed the line as should be and 1st check was the problem after a quick clean and flush out every thing worked as should .