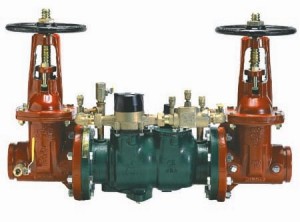
I have a 4” Conbraco model 4S-600 on a fire system that needs some work. Before getting started, I wanted to ask if you had any information or tips on what to expect when I open this assembly.

Mark:
The Conbraco 4S-600 aka (DCDA4S) is a double check detector assembly. Production of this unit started in 1999. The 4S-600 utilizes a ½” model 4S-103 for the bypass device. Each access cover for mainline assembly is secured by bolts and sealed by a gasket. Before removing the check cover, it is important to remove the black plastic spring caps that are located on top of each check valve. The spring caps are there to simply protect the spring assembly that protrudes through the check cover. Note: The check valve cover cannot be removed without first taking off the spring cap. These are removed by un-screwing counterclockwise. The spring caps should be hand tight, but depending on the age of the assembly you might need to use a wrench to loosen.

Doug:
The check valve modules for the 4S series are secured by the check cover and sealed by an o-ring. With the spring caps out of the way, the access cover can be unbolted and removed. There is no spring load on the cover.
Once the cover is removed, pry the top portion (spring assembly) of the check valve towards the downstream side of the assembly. Depending on the age of the device, you may need to use a standard screwdriver to pry the check valve loose and then lift the check valve module out of the device body.


Mark:
The next step is to release the spring tension of the check valve. To do this, we need to remove the spring assembly from the check module. Note: Do not remove the socket bolt at the top of the spring assembly. This retainer bolt holds the spring in the compressed position. The spring module is threaded into the top of the check assembly and is removed by turning counterclockwise. You may need to use a wrench on the flats near the top of the spring module to aid in its removal. After removing the spring module, the disc holder is able to swing open without any tension.

Doug:
To replace the rubber check disc simply remove the retainer bolts and retainer plate from the disc holder. After replacing the rubber and cleaning the check seat, the spring module can be reassembled onto the check valve (hand tight). When reinstalling the checks back into the unit, place the bottom of the check valve into the bore of the body. Once the bottom side of the check is in place, push the top side of the check valve into place until the o-ring is fully seated. When replacing the cover gasket, be careful not to align it in a way that will cover the test cock opening. After bolting the cover back into place, lube the o-ring on the plastic spring cap and secure (hand tight) to the access cover.


Authors |
|
 Mark Inman |
In our line of work, we field questions from contractors and technicians concerning repairs, installations and general backflow prevention practices. We’d like to share some questions that we receive, as well as our answers. Everyone has different opinions on these subjects and we would like to hear yours.
Contact us with questions and ideas via email at: or mail us at: |
 Doug Taylor |
|


 30 May 2018
 Posted by BP Journal


1 Comment
Come on guys, a pipe wrench on a flat plastic nut assembly? That’s just asking for trouble. A wrench with flat parallel jaws would be best. I use my Wilton machinist vise with soft brass jaws. I spin it out by hand. This vise is mounted on my tool chest and is extremely handy for doing such repairs.
Cliff